CSV Walkthrough
CSV Walkthrough
Introduction
Thinking back on projects and class lessons, how have you been making instances of objects so far?
Likely you have been creating an instance of the object you need:
- Directly in a
runner.rbfile. - In your setup in spec files.
- Collecting user input and using that information to instantiate.
- Receiving API data (DMV Project), using that data to instantiate in a “factory”.
- Creating a Class Method that takes data and turns creates instances with the data sent into the arguments.
What if there was a larger set of data that you wanted to use to create objects?
Using files to create objects
Sometimes the data that we want to use will be stored in a CSV. CSV is a file type that stands for comma separated values. Think of it similar to a spreadsheet or an excel sheet. The information within these files can be organized in columns and rows and might look like this:
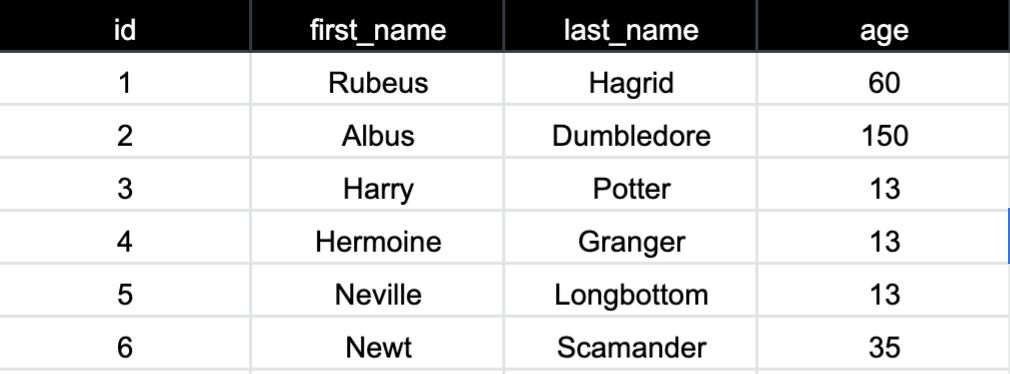
The first row is the headers for each column which gives us information about the values in the rows below. Each row we can think of as being a package of information that belongs together. Looking at our example we should see the first package of information is 1, Rubeus, Hagrid, 60. We know that 1 is the id, Rubeus is the first name, Hagrid is the last name and 60 is the age because of the header for each column in which the information is located.
Rows and columns are nice for us to visually organize information, but what if we want to use that information in our application? Ruby has helped us by having a defined class called CSV. This class contains methods that we can use to interact with a file.
In Ruby, there are classes already defined for us that will allow us to read and write files. Today we are going to focus on the CSV class and how to read a file to create instances of our objects. We will be using this repo as an example. Take a moment to look at the files and what they contain.
The ./lib/runner.rb file is where we will be writing out code to read our files and create objects. To start, we are going to require 'CSV' so that we will have access to its methods. Next, we want to use the foreach method from CSV and pass it an argument of the file that we want to read. Similar to the each enumerable the foreach creates a block where the block variable will be a single row in the file. Now add a pry within the block so we can see what a row looks like in our block.
require 'CSV'

CSV.foreach('./data/animal_lovers.csv') do |row|
  require 'pry'; binding.pry
end
Congrats, you are reading a csv! Since, we know we have access to the information in the file a row at a time we now just need to create objects using that information. As you noticed our first row is the headers row and doesn’t contain any data to create an object. Let’s update the foreach arguments to include the following:
require 'CSV'
# headers: true & header_converter: :symbol are optional arguments
CSV.foreach('./data/animal_lovers.csv', headers: true, header_converters: :symbol) do |row|
  require 'pry'; binding.pry
end
Now what does row look like in pry?
What did these two options accomplish? You can check out the official documentation here in the Ruby Docs for the CSV library.
These optional arguments help format the row information to be more manageable to work with so that you can create new objects. Now let’s create an instance of the Animal Lovers class from our data.
With a partner see if you can explain what is happening in the code below and use pry to confirm your assumptions.
require 'CSV'
require './lib/animal_lover'
# headers: true & header_converter: :symbol are optional arguments
CSV.foreach('./data/animal_lovers.csv', headers: true, header_converters: :symbol) do |row|
  id = row[:id].to_i
  first_name = row[:first_name]
  last_name = row[:last_name]
  age = row[:age].to_i
  animal_lover = AnimalLover.new(id,first_name,last_name,age)

  require 'pry'; binding.pry

  puts "#{animal_lover.full_name} has been created!"
end
Practice
- On your own, try reading the file and creating magical pet objects.
- Head over to the “big repo” and find the
event_managerdirectory. It can be found under../mod-1-be-exercises/lessons/csv_files/event_manager. Follow the instructions in theexercise.mdfile. The Readme will also provide some additional information.